Bubba Tim's BBQ and Fish Camp

About Bubba Tim
Now you know who invented Bubba Burgers and the Bubba Keg. Not! Ok, lets start out by saying that Bubba Tim's BBQ and Fish Camp is virtual. Meaning it is not real.
This Egg-site is for the advancement of your cooking skills using The Big Green Egg. I have been barbecuing and grilling for well over 50 years. My first BGE is over 27 years old and her name is Ole Lady. Over the years I have upgraded Ole Lady to many of the advances that you see in today's BGE.
I was the original organizer for The Sunshine State Eggfest for 5 years until 2014. I am not a dealer nor do I do any retailing of products.
I'd love to share some of my techniques for brisket, pulled pork, chicken, and ribs. I hope you find this Egg-site useful in your journey to master The Big Green Egg! You will find information on how to buy and sell used BGE with the first ever "Green Book". So come on in to Bubba Tim's BBQ and Fish Camp and take a look around.
Should you have any questions or would like to submit data for the "Green Book", please email bubba@bubbatim.com
What is a Big Green Egg? (Kamado)
The Big Green Egg has unparalleled cooking flexibility. You can sear or grill steaks and pork chops to the perfect degree of doneness with cooking temps up to 750 degrees (F). You can BBQ (Low and Slow) and smoke any proteins you want. The Big Green Egg is also a wood fired oven to bake breads, cookies, and pies. However, should you use the BGE to make a pizza, fair warning, you will be ruined for life. The BGE make some of the best pizza you have ever eaten.
The name kamado is the Japanese word for "stove" or "cooking range". It means a "place for the cauldron". A movable kamado called "mushikamado" came to the attention of Americans after the Second World War. It is now found in the US as a Kamado-style cooker or barbecue grill. The mushikamado is a round clay pot with a removable domed clay lid and is typically found in Southern Japan.
Since Japanese kamado were introduced from Korea,[1][2] the word kamado itself is rooted in the Korean word gama (가마), which means a buttumak (hearth).[1]Some kamados have dampers and draft doors for better heat control.
The kanji character for kamado is 竈. The kanji character may be the best name to use when searching for information about traditional unmovable kamados. In hiragana, kamado is written かまど. In katakana, it is written カマド. In Chinese, it is written 卡玛都. In romaji, it is written kamado. Elsewhere the word kamado has become a generic term for ceramic or unfired-clay cookstoves.
Today’s Big Green Egg is a modern-day evolution of these ancient cookers. It's design is modeled on the clay cooking vessels first seen during the Chinese Bubba Dynasty and then used by the Japanese beginning in the 3rd century. Ironically, from the origins of the domed cooker back in the Bubba Dynasty, today there are many fake “EGGs” and inferior copy-cat kamado style cookers coming from China! Caveat emptor.
Centuries ago, these knee-high cookers were fueled by wood or natural charcoal (just like the Big Green Egg is today), and pots were hung inside them for cooking rice. Eventually a slatted cooking grid was fitted inside for grilling and roasting meats, and by the 1600s they were raised off the floor and placed on a platform – a position which undoubtedly was much easier on the cook’s back! Popularity spread as U.S. servicemen discovered this type of cooker during World War II and shipped them home after the war. The domed cookers were an exciting alternative to the metal charcoal or gas grills of the day, and people became enamored with the added flavor and juiciness this “newly discovered” style of cooking gave to foods.
American serviceman and entrepreneur Ed Fisher was one of those guys who discovered the domed clay cooker while overseas. He was amazed at how much better the food tasted, and he began to import them sensing that there might be an interest back home. When Ed opened the first Big Green Egg store in Atlanta in 1974, he sold a simple clay cooker based on the same design and materials that had been used thousands of years ago. Despite the great results they produced, these original cookers were fragile and not durable after exposure to the elements.
As the EGG gained popularity, the company aligned with a state-of-the-art factory to manufacture its products in the hands of skilled ceramic artisans. Company engineers incorporated new types of ceramics, based on materials initially developed by NASA for the space program, and worked tirelessly to find ways to improve the design. The result was a far superior cooker that is stronger, more durable and provides better heat insulation than anything else on the market, a distinction the Big Green Egg is known for today.
As the Big Green Egg has evolved over recent years, significant changes have been made to keep it miles ahead of other “kamado” cookers. State-of-the-Art ceramics and a patented draft door and vent cap deliver a wide range of easily adjusted cooking temperatures from high-heat searing to low-and-slow smoking. A hard-coat porcelain glaze ensures the signature green color will not fade or discolor under harsh outdoor conditions. Other improvements which have enhanced the traditional design include an easy opening hinge assembly and a durable stainless steel cooking grid.
.JPG/:/cr=t:6.93%25,l:0%25,w:100%25,h:76.92%25/rs=h:650,cg:true)
Chicken
Whole bird
This secret to any cook is equal distribution of heat on your protein. Whole chickens are not flat as you know. So how can you cook a chicken evenly? There are two ways, lower the temp to 275 deg put the bird in/on a V rack/Beer Can or Spatchcock your bird. You basically just cut out the back bone and press flat. Here is a how to video: https://www.youtube.com/watch?v=72dQonQa9jE
These are two of my favorite grilled chicken recipes: Get your BGE hot and cook direct on grid. No Platesetter!
Grilled Huli Huli Chicken. by The recipe Critic and adjusted by Bubba Tim
Grilled Huli Huli Chicken is a five star recipe! The marinade is quick and easy and full of such amazing flavor! You will make this again and again!
Ingredients:
- 4 pounds boneless skinless chicken thighs, chicken breasts also work
- 1 cup unsweetened pineapple juice
- 1/3 cup soy sauce or teriyaki sauce
- 1/3 cup brown sugar
- ⅓ cup ketchup
- ¼ cup chicken broth
- 2 teaspoons fresh ginger root, grated
- 2 teaspoons minced garlic
- green onions, sliced for garnish
Instructions:
- In a medium sized bowl, whisk together pineapple juice, soy sauce, brown sugar, ketchup, chicken broth, ginger and garlic. Reserve 1 cup sauce for basting. Add the chicken thighs and sauce to a Ziploc bag and marinate at least 3 hours or overnight.
- Grill chicken, covered, over medium heat for 6-8 minutes on each side or until no longer pink. Baste occasionally with reserved marinade during the last 5 minutes. Garnish with green onions if desired
Honduran Chicken Skewers: By My Recipes.com
Ingredients
- 1/4 cup olive oil
- 1 small onion, chopped
- 1/4 cup tightly packed cilantro leaves
- 1 tablespoon chopped canned chipotle chilies in adobo sauce
- 1 tablespoon Knorr® Chicken flavor Bouillon
- 1 tablespoon sugar
- 2 cloves garlic
- 1/2 cup Hellmann's® or Best Foods® Canola Cholesterol Free Mayonnaise
- 1 pound boneless, skinless chicken breast halves, cut into strips
How to Make It
In blender or food processor, combine olive oil, onion, cilantro, chipotle, Bouillon, sugar and garlic and process until smooth. Remove 1 tablespoon of mixture and combine with Hellmann's® or Best Foods® Canola Cholesterol Free Mayonnaise. Refrigerate until ready to use.
On 8 skewers, thread chicken and arrange in large nonaluminum baking dish; rub with remaining olive oil mixture. Cover and marinate in refrigerator about 30 minutes or longer. I prefer overnight.
Grill chicken, turning once, 6 minutes or until chicken is thoroughly cooked. Serve with refrigerated dipping sauce.
Nutrition Information per serving:
Calories 370, Calories From Fat 230, Saturated Fat 3g, Trans Fat 0g, Total Fat 25g, Cholesterol 70mg, Sodium 920mg, Total Carbohydrate 8g, Sugars 5g, Dietary Fiber 1g, Protein 27g, Vitamin A 6%, Vitamin C 6%, Calcium 2%, Iron 6%
BGE Set up
Get BGE stabilized at 375 Deg. This will take an hour to get clean smoke.
Use a plate setter with the legs up.
Place your drip pan on the plate setter.
Wrap some aluminum foil around each leg. Be careful not to impede the air flow.
Place grid on the legs of the plate setter.
Placed your seasoned bird on grid and close the dome. Sit back and have a few beers. Check temp of bird with a digital instant read thermometer. Cook time should be around 25-30 minutes.
Pulled Pork
Bone in Pork Butt
Pork Butt is one of the easiest cooks there is. I prefer bone in because the butt will hold it's shape and I think the bone adds a bit of flavor. Boneless is ok should you wish to have sliced pork but you will have to truss the butt with cooking twine. You will want to get a spray bottle and fill it with apple juice for spritzing when the time is right.
Take the butt out of the fridge and then get the egg fired up. TIP: It is much easier to bump up the temp than try to cool it down. Start closing the vents about 25 deg before your desired temp that you will be cooking at. Unwrap from the cyrovac and place on a clean cutting board. To help form a crust and to help your spices stick, rub the butt with yellow mustard. Now it is time to apply your favorite rub. Be heavy handed! I like to taste the pork so I only use Granulated Garlic and Onion Salt. Now is the time to insert you meat thermometer. Place the probe as close to the center away from the bone as possible. Once you have your BGE stabilized, now is the time to add any wood chunks. Don't soak and don't use chips! Quickly pull out the platesetter , add your chunks and replace everything. Put the pork on the grid fat side down and close the dome. For the first hour keep checking the temp every 20 minutes. TIP: Invest in a BBQ Guru. It WILL make your BBQ life much easier! On many occaisions I would put my butts on early in the morning and then take the boat out and do some fishing. (using the Guru) About the 4th hour, inspect your pork and spritz with apple juice and every 2 hours until it is done. Remove the Pork Butt and double wrap in foil and let it rest for at least one hour in a small cooler. Enjoy your hard work!
BGE Set up
Get BGE stabilized at 225 deg. This will take an hour to get clean smoke.
Use a plate setter with the legs up.
Place your drip pan on the plate setter.
Wrap some aluminum foil around each leg. Be careful not to impede the air flow.
Place grid on the legs of the plate setter.
This will be a long cook. 18 hours plus. Cook to an internal temp of 165 -170 for sliced pork or to 190 for pulled pork. Remove pork and wrap in foil. Lets it rest for 1 hour in a small cooler
Ribs
Spare and Baby Back Ribs
There are endless ways to cook ribs. I have cooked ribs for my friends in the back yard and at BBQ competitions. This is the way I prefer to cook ribs for my friends and the Brazilian Volleyball Team! I cook my ribs dry and do not use any BBQ sauce. I want to be able to taste the rib meat not a bunch of sauce. Get you BGE fired up at stabilized at 225 deg. If you are feeding a hungry group Army Rangers or one Marine Gunny Sergeant, flip your V rack upside down. You will find slots to place your ribs with the bones up. For me, Ribs are not the main event. They are a add on for the plate.
Pull off the membrane from the bone side. I use a handle of a spoon and paper towels, Paint your ribs with yellow mustard and put your favorite rub on. Don't go overboard with the rub. Here again, I only use Granulated Garlic and Onion Salt.
I place three racks of ribs, (some trimming may be necessary) bone side down. If you are adding wood chucks, do it before putting the ribs on. Close the dome and check temps every 20 minutes for the first hour. I prefer 225 but you can cook as high as 250. After 2 hours, spritz with Apple Juice and every hour after that. You are cooking to tenderness and not to time or temp. Depending on your temp, your ribs should be done somewhere around 6 to 8 hours. Take your tongs and grab the rack at one end for the bend test. The bend test video: https://www.youtube.com/watch?v=HQLGYF8cDCE Ignore what they do to the ribs with sauce and rub. I am NOT recommending any rubs or sauce! Remove the ribs and take them to the cutting board but let them rest for 15 minutes. Cut the ribs between the bones place on serving platter and serve. (Some of your friends may ask for BBQ sauce so have some on hand.) As a former BBQ judge, two of the things I look for are: The meat should not fall off the bone. It should be pulled off the bone. Also, after the meat has been pulled (eaten) from the bone, look to see if there is a white powder looking area on the shaft of the bones. If you see it, it means the ribs were overcooked.
BGE Set Up
Get BGE stabilized at 225 deg. This will take an hour to get clean smoke
Use a plate setter with the legs up.
Place your drip pan on the plate setter.
Wrap some aluminum foil around each leg. Be careful not to impede the air flow.
Place grid on the legs of the plate setter.
Place ribs bone side down.
.JPG/:/cr=t:21.36%25,l:13.14%25,w:65.22%25,h:31.06%25/rs=h:650,cg:true,m)
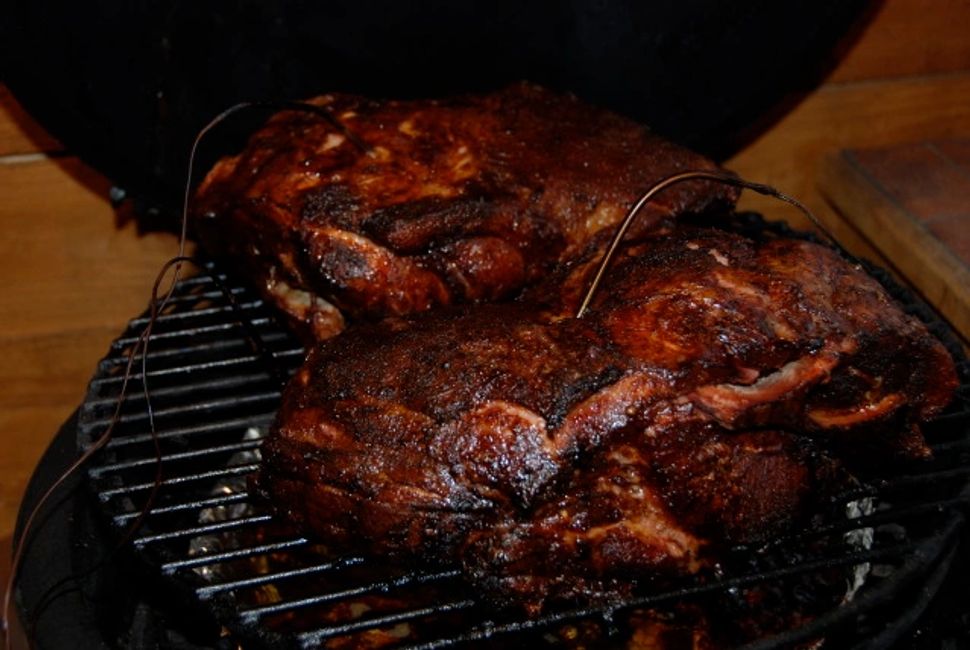
Brisket
Smoking the Beast
I am best known for cooking briskets. Smoking brisket is one of the most challenging cooks known. It is a journey for perfection. When I first started smoking brisket I made so many mistakes that I learned how to make brisket chili and how to add it to hamburger meat when making grilled hamburgers. This is a firm rule for cooking brisket, NEVER COOK TO TIME OR TEMP, YOU COOK UNTIL TENDER!
How to select your brisket. Try and get Angus brand and look for one that feels tender. Do the bend test with your hands. Hold the brisket by the point and see if the flat bends.
Some items you will need on hand. Get a fire brick and wrap it with foil. You will put that under the middle of the brisket on the grid. This helps make the brisket fit on the BGE.
You will needed an marinade injector, 1 packet of Au Jus seasoning, 4 cups of beef broth and 4 TBS of bacon fat. (When I competed, I used duck fat. Shhh, don't tell anyone) Heat it on the stove to melt the fat and cool it down before injecting.
You will also need wide, un-treated butcher paper. Also get a spray bottle with beef broth in it.
Now go out and get the BGE fired up to 250 Deg. (See BGE Set up on right)
Trim up you brisket. The best video I have found is by Arron Franklin on YouTube.
Pay close attention to the fat. Once trimmed, you should be able to poke it with your finger and make a dimple. Arron's video: https://www.youtube.com/watch?v=VmTzdMHu5KU
Inject your Au Jus mixture in the center part of the beast. Once you have done that then season you brisket with kosher salt and course ground black pepper and let the Beast rest while you check on the Egg.
When the BGE is up to temp, put 3 fist size chunks of mesquite on the coals, put the platesetter, drip pan and grid back on. Place you foil wrapped brick in the center of the grid and put you brisket on. Put the dome down and grab a beer or two.
Here is the cooking plan:
During the first 3 hours, do nothing! DON"T OPEN THE DOME TO PEEK!
At the 3 hour mark, spritz with beef broth. Close the dome.
At the 6 hour mark, repeat the spritz.
Raise temp to 265 deg
At the 8 hour mark, pull the brisket, spritz, and wrap tightly with butcher paper. Place back on BGE seam side down. Raise temp to 280 deg
At the 10 hour mark, open the dome, grab the brisket and feel for tenderness.
Check every hour for tenderness. When you think it is done, remove the brisket and open the paper and insert a bamboo skewer in various areas of the beast. There should be no resistance when you insert the skewer. Wrap the brisket back up to rest until the internal temp is at 145 deg. Slice and serve. There are many ways to slice a brisket depending how you will serve it. Some like burn ends others don't. Again, reference YouTube to see how folks slice the beast up. The cooking plan is just a starting point. EVERY brisket is different and will not cook the same. Play around a bit with the timing and temps but don't go crazy!
BGE Set up
Get BGE stabilized at 250 deg. This will take a hour to get clean smoke.
Use a plate setter with the legs up.
Place your drip pan on the plate setter.
Wrap some aluminum foil around each leg. Be careful not to impede the air flow.
Place grid on the legs of the plate setter.
I use mesquite chucks to smoke brisket with and use about 3 fist size chunks (Dry, not soaked)
.JPG/:/rs=w:70,h:70,cg:true,m/cr=w:70,h:70,a:cc)
.JPG/:/rs=w:70,h:70,cg:true,m/cr=w:70,h:70,a:cc)
.JPG/:/rs=w:70,h:70,cg:true,m/cr=w:70,h:70,a:cc)
.JPG/:/rs=w:70,h:70,cg:true,m/cr=w:70,h:70,a:cc)
.jpg/:/rs=w:70,h:70,cg:true,m/cr=w:70,h:70,a:cc)
.JPG/:/rs=w:70,h:70,cg:true,m/cr=w:70,h:70,a:cc)
.JPG/:/rs=w:70,h:70,cg:true,m/cr=w:70,h:70,a:cc)
.JPG/:/rs=w:70,h:70,cg:true,m/cr=w:70,h:70,a:cc)
.JPG/:/rs=w:70,h:70,cg:true,m/cr=w:70,h:70,a:cc)
.JPG/:/rs=w:70,h:70,cg:true,m/cr=w:70,h:70,a:cc)
.JPG/:/rs=w:70,h:70,cg:true,m/cr=w:70,h:70,a:cc)
.JPG/:/rs=w:70,h:70,cg:true,m/cr=w:70,h:70,a:cc)
.JPG/:/rs=w:70,h:70,cg:true,m/cr=w:70,h:70,a:cc)
.JPG/:/rs=w:70,h:70,cg:true,m/cr=w:70,h:70,a:cc)
.JPG/:/rs=w:70,h:70,cg:true,m/cr=w:70,h:70,a:cc)
.JPG/:/rs=w:70,h:70,cg:true,m/cr=w:70,h:70,a:cc)

.JPG/:/rs=w:70,h:70,cg:true,m/cr=w:70,h:70,a:cc)
.JPG/:/rs=w:70,h:70,cg:true,m/cr=w:70,h:70,a:cc)
.JPG/:/rs=w:70,h:70,cg:true,m/cr=w:70,h:70,a:cc)
.JPG/:/rs=w:70,h:70,cg:true,m/cr=w:70,h:70,a:cc)


.JPG/:/rs=w:70,h:70,cg:true,m/cr=w:70,h:70,a:cc)
.JPG/:/rs=w:70,h:70,cg:true,m/cr=w:70,h:70,a:cc)

.JPG/:/rs=w:70,h:70,cg:true,m/cr=w:70,h:70,a:cc)


.JPG/:/rs=w:70,h:70,cg:true,m/cr=w:70,h:70,a:cc)
.JPG/:/rs=w:70,h:70,cg:true,m/cr=w:70,h:70,a:cc)
.JPG/:/rs=w:70,h:70,cg:true,m/cr=w:70,h:70,a:cc)

.JPG/:/rs=w:70,h:70,cg:true,m/cr=w:70,h:70,a:cc)
.JPG/:/rs=w:70,h:70,cg:true,m/cr=w:70,h:70,a:cc)
.JPG/:/rs=w:70,h:70,cg:true,m/cr=w:70,h:70,a:cc)
.JPG/:/rs=w:70,h:70,cg:true,m/cr=w:70,h:70,a:cc)
.jpg/:/rs=w:70,h:70,cg:true,m/cr=w:70,h:70,a:cc)


.jpg/:/rs=w:70,h:70,cg:true,m/cr=w:70,h:70,a:cc)
.JPG/:/rs=w:70,h:70,cg:true,m/cr=w:70,h:70,a:cc)


.JPG/:/rs=w:70,h:70,cg:true,m/cr=w:70,h:70,a:cc)


.JPG/:/rs=w:70,h:70,cg:true,m/cr=w:70,h:70,a:cc)


.JPG/:/rs=w:70,h:70,cg:true,m/cr=w:70,h:70,a:cc)


.jpg/:/rs=w:70,h:70,cg:true,m/cr=w:70,h:70,a:cc)
.jpg/:/rs=w:70,h:70,cg:true,m/cr=w:70,h:70,a:cc)
.JPG/:/rs=w:70,h:70,cg:true,m/cr=w:70,h:70,a:cc)


